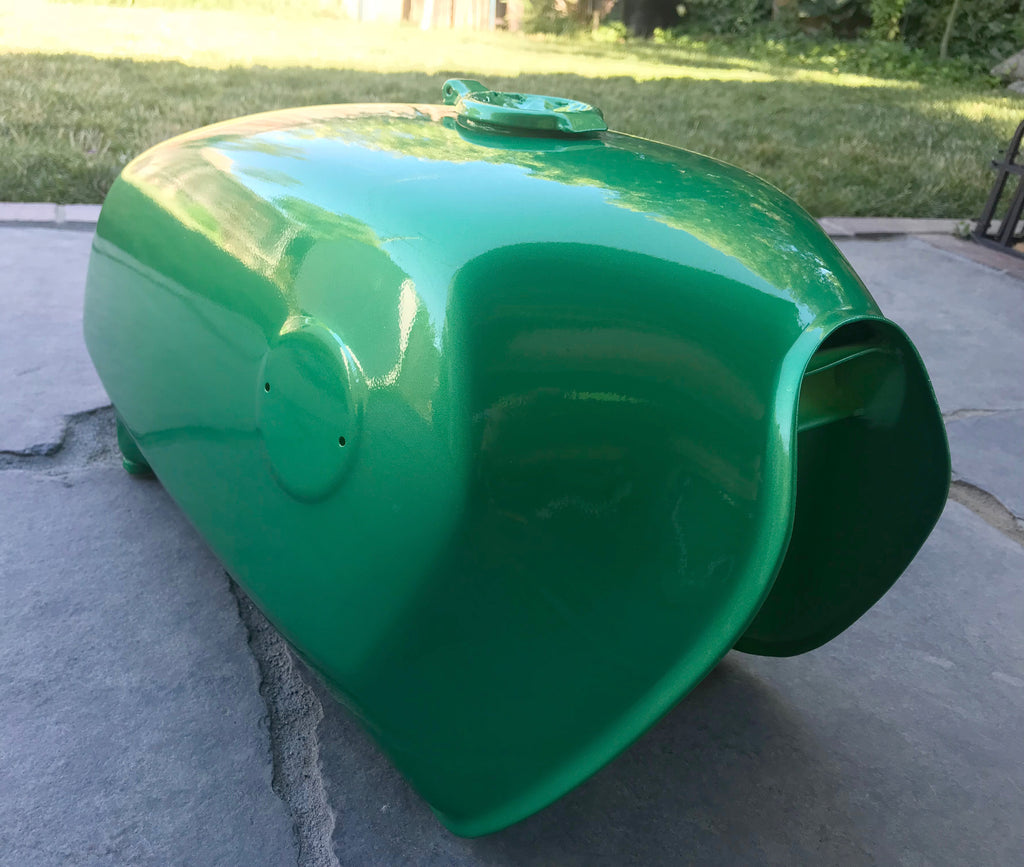
1971 BMW R75/5 Toaster Tank Paint Project
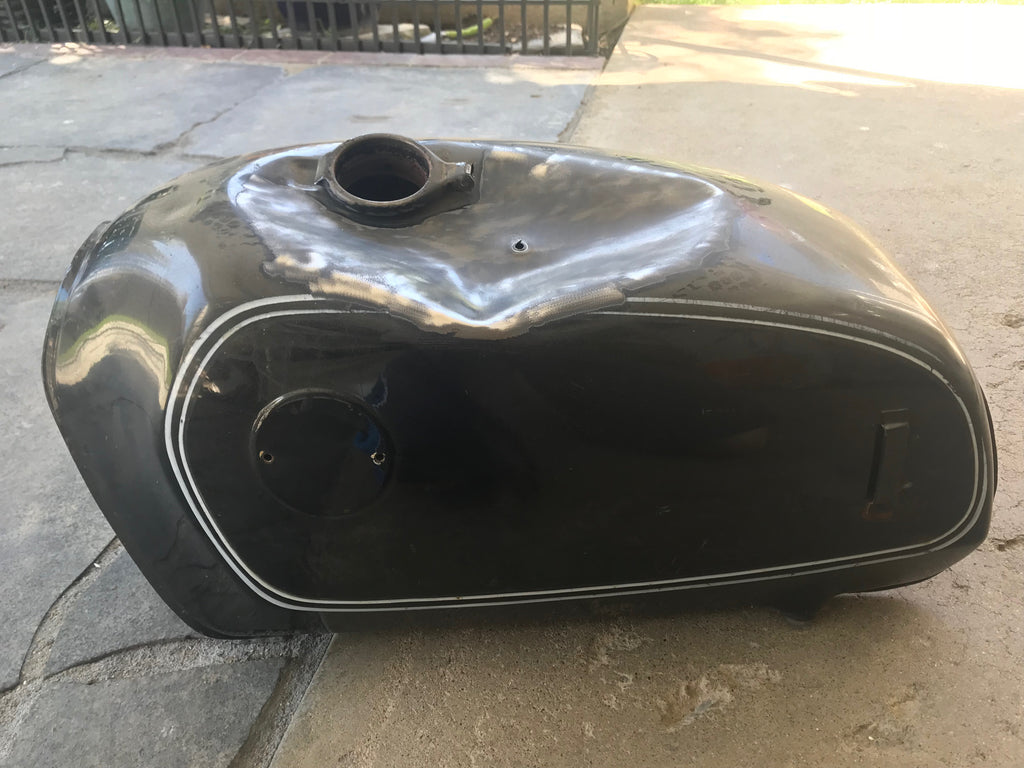 This story begins with the remnants of what could be assumed only to be collateral damage. A physical memento of a proud man's better half mistakenly underestimating the gas tank's structural integrity enough to hold weight for only a moment. But a minute passed and "slump"!?%$ There it goes! Well what do we do with it now? It almost looks good enough to hang it on the wall as is, however, the story of its origins may need to be embellished.
 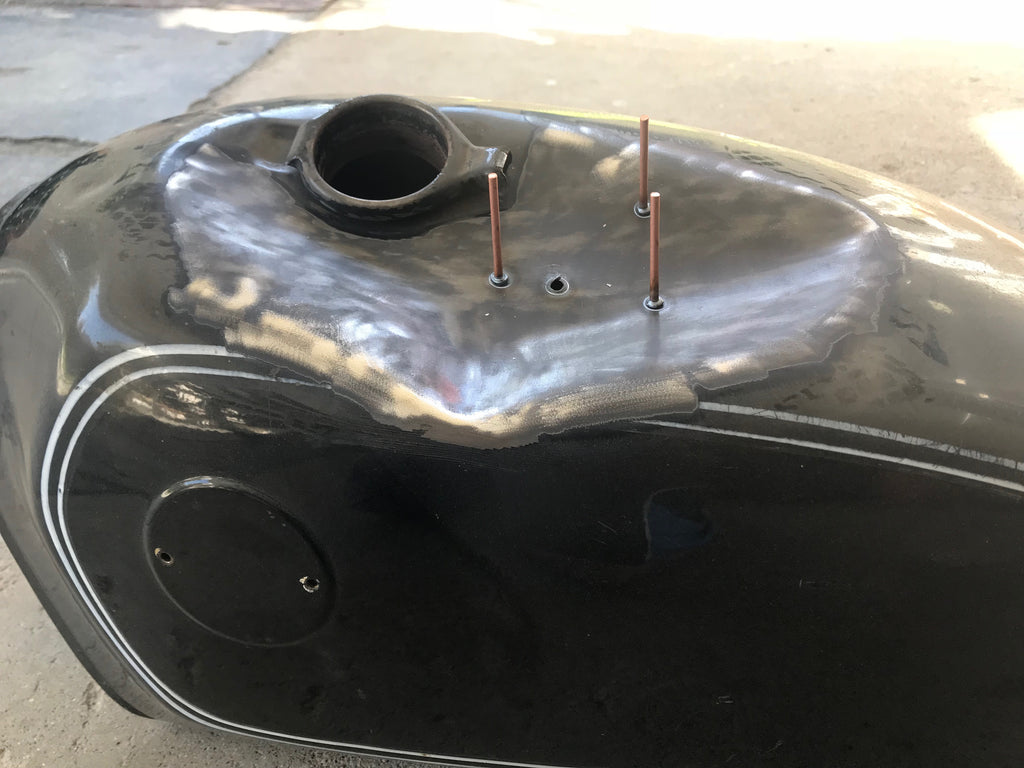 First step in this behemoth of a project is determining if this tank matters enough to you to undertake the task. This will be hours upon hours of hard labor and elbow grease. The biggest obstacle will be getting the fuel tank opening at the right level and straight. I am using a stud puller to get the metal close to where it was but not too high. Unfortunately the metal of the tank is so thin that it can't support the force pulled by the studs. In my years of paint practice, this is how I've done it. There's many ways to pull a dent out some of which being easier on the metal but time and the scarcity of the correct tools renders this the best route for me and I've done this many times successfully for my paint customers.
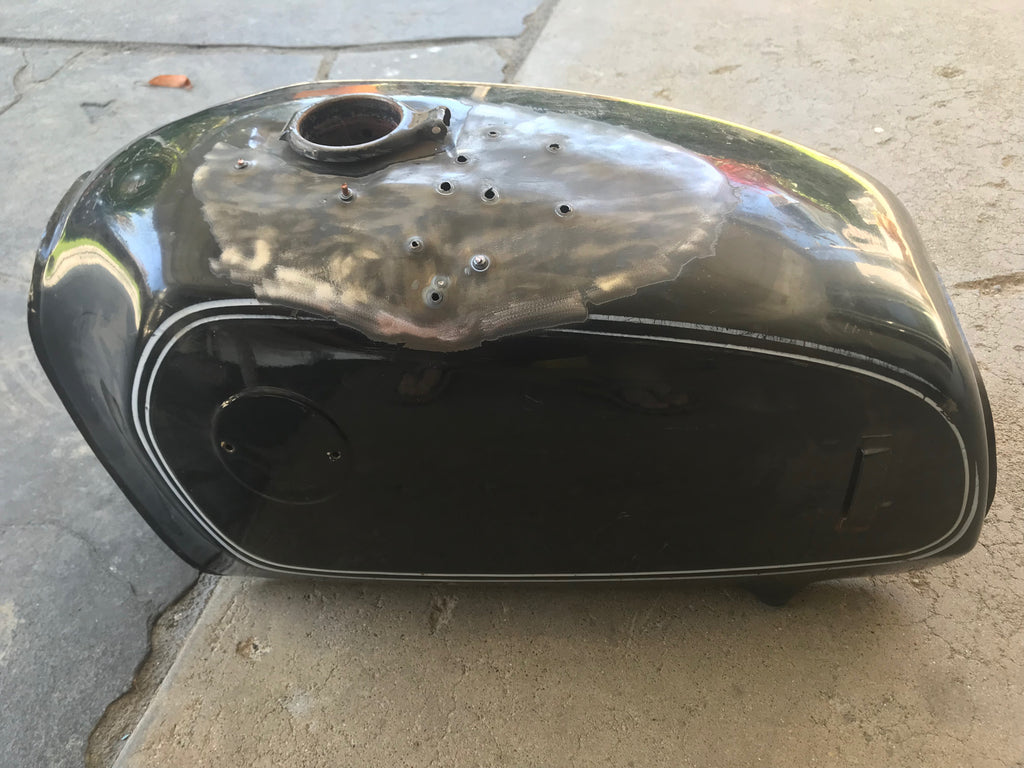
The main question all of you Beemer purists will ask is how are you going to seal up those nasty holes? Well, if you were going to do things the absolute correct way, there wouldn't be any holes in the first place!!! But, improvising always works as long as you do it the right way. Also, keep in mind that if this gas tank had some type of sentimental value and was to be used in operation again, I would have cleaned out the inside of the tank via liner stripper, boiled out the inside (can be done at your local radiator shop), and re-lined the tank with a catalyzed liner. The holes need to be welded closed and then JB weld is applied over each weld. This is why its important to not bring the metal too high up. You need to leave room for the JB weld and then bondo. JB weld is gas resistant for a LONG time if not permanently. The company makes gas tank repair weld, water weld (wet areas), and many other types. Most though are all gas resistant. Ive been in the industry for 15 years and have been practicing using JB weld on gas tanks in service and I can't speak any higher of the product. I should mention that, in the industry, there are a lot of different companies who provide comparable adhesives and sealants as well. 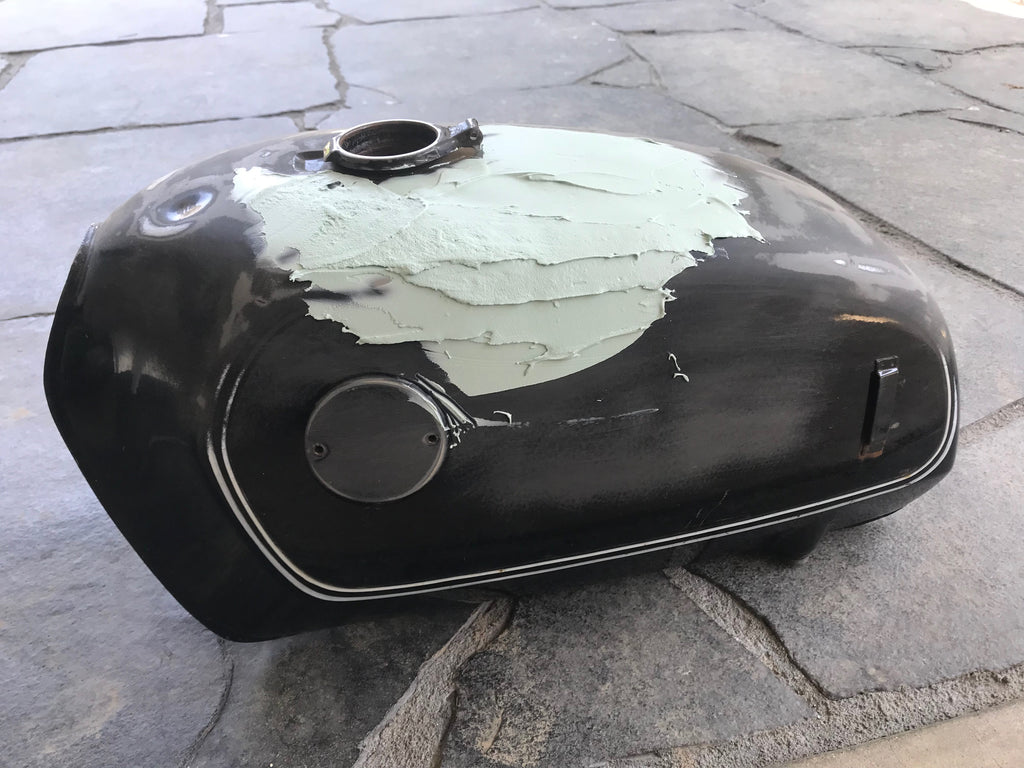
This is where most of the work begins. The bondo! Everybody loves bondo right!? Nope! The bondo needs to be applied in relatively thin layers- not too much more than 1/4" to 3/8". Too much bondo applied at once could cause its structure to become week and lead to cracking or instability. The problem i'm facing is getting the fuel tank opening at the right level. It also looks like I'll be applying bondo to literally the entire top surface of the tank. I will also, cut off the brackets that hold the side covers for the tank. This is just a personal choice. Not going to have this biked judged for period correctiveness.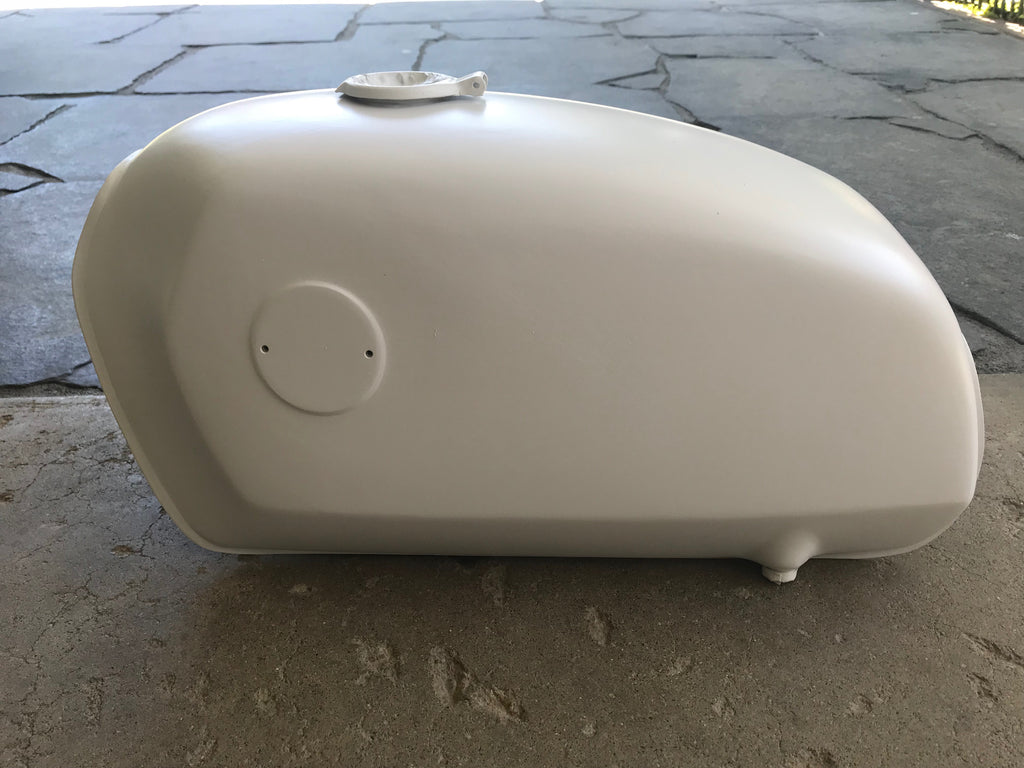
Here's the tank at the second primer stage. What you don't see is the the gritty appearance left behind by the sand paper I use to form the bondo. I use 60 grit sand paper attached to a foam backed handle. Its all done by hand- no power tools. Sanding the bondo down by hand allows much more control over contouring and allows the detection of high and low spots. I used about 5 or 6 layers of bondo here. At the last layer, I used 120 grit sand paper on the same handle to lightly clean up the rough areas left by the 60. I didn't, however, try to sand the bondo down to the 120 level. I used the first coat of primer to essentially fill in the groves left by the 60. The first coat of primer also shows any pin holes left in the bondo. Using a high grade bondo (about $30 - $60 a gallon) will be lighter in weight, easier to sand, and leave less pin holes. The pin holes (after the first coat of primer) are then identified and filled in using a feather fill product. I use feather fill made by 3M. Its an excellent product. In the automotive industry, its always a safe bet to go with medium grade materials. Don't buy the cheap stuff! After the feather fill dries, I applied a black guide coat. This allows you to easily sand down the primer to the right level (just enough see the 60 grit scratches disappear). In this case, I also identified a low spot in the bondo and I was able to sand the whole surface down to come to that level. Basically when you're sanding the primer (with 120) and you see an area where the guide coat is not getting sanded away, there's your low spot. One thing I forgot to mention is the primer I use is a medium grade catalyzed automotive primer made by Medallion- a Valspar product. It's got great fill properties, builds and flows nicely, and is very easy to sand. Ive tried lots of primers (expensive and cheap) and this one is just right! One issue with the fuel tank opening and neck is that I had to bondo over the indentation in the tank that allows clearance for the fuel cap latch. I will have to slightly grind down the latch on the fuel cap so it doesn't hit the tank when closed. 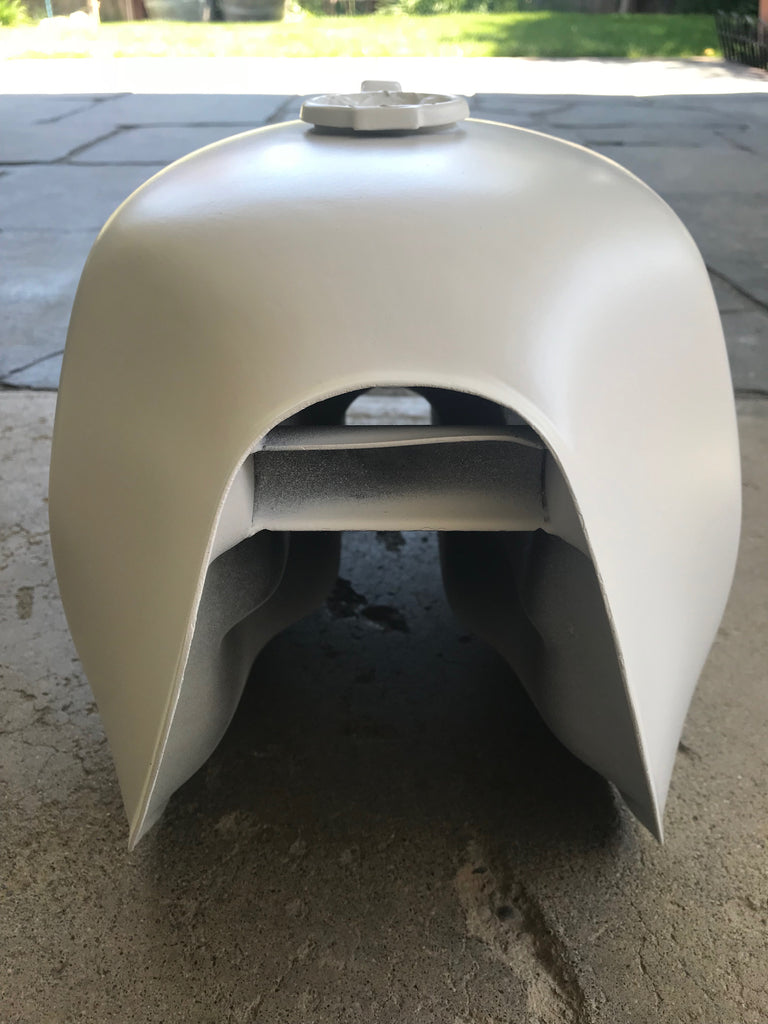
This is just another picture at the same stage -second coat of primer. After sanding down the guide coat and feather fill with 120, a second coat of primer is then applied. (its really 2 coats in the painting process). On other jobs, without bondo, I can then sand from 120 directly to 400 or 500 with a DA sander and then paint. But usually over bondo, I like to make sure there's ENOUGH primer on there because all primers have a tendency to shrink down as they dry. Sometimes on a paint job you can see a sillouette of where the bondo is if you're not careful (especially on metallic silver jobs). After this second coat, ill apply another guide coat and sand down the primer with 220. This is a little overkill but I want to make sure the contour is smooth since theres so much bondo. Stay tuned as the progress continues!
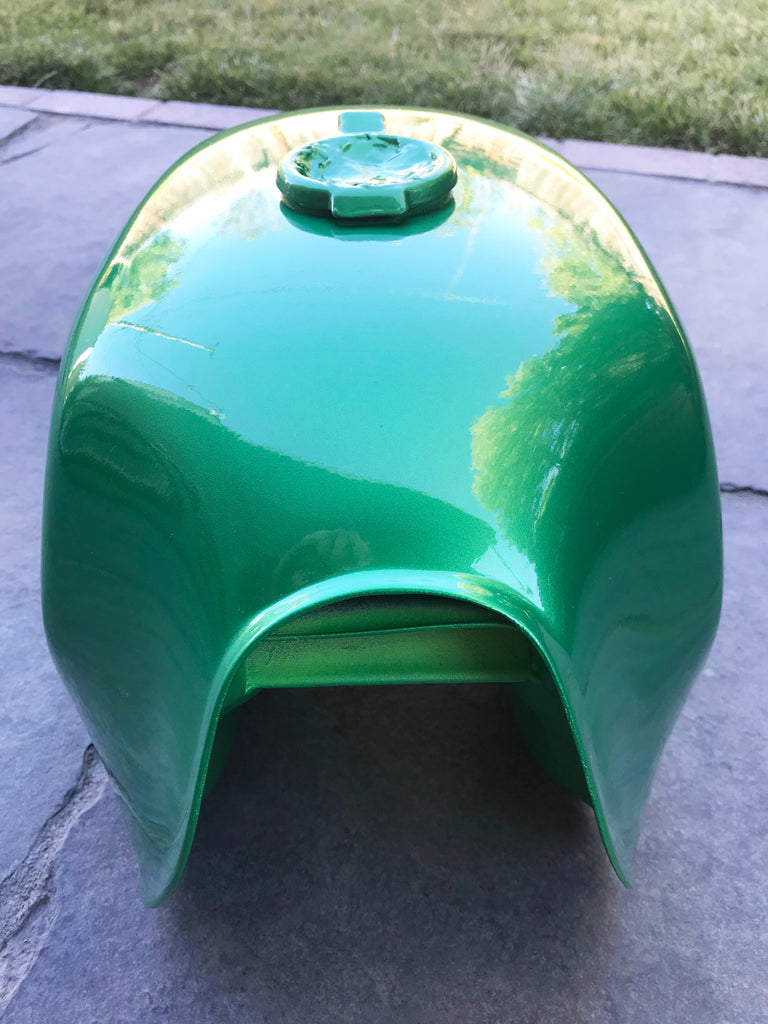
Alrighty! Lets see...where did I leave off? Oh yea...last coat of primer. Once the final coat of primer is applied (I usually like to reduce my primer so its very smooth on the last coat), I apply another guide coat. I sanded the tank down with a DA sander using 500 grit paper and lots of water. You sand until all of the guide coat has disappeared leaving you with a perfectly smooth finish. Then to paint! What you're seeing here is the base coat paint and an inter-coat clear. It took me a total of 8 coats of paint to provide adequate coverage here due to the transparency of green pigments. Some colors are easier to paint than others. I then used a quick dry clear as my inter-coat. You don't have to pound the clear on this coat. Notice how its got a lot of orange peel? That's okay, were going to sand it down for pin-striping.
Its a really cool color right? It's not the exact color but its close to the green that came stock on the 1973 R75/5.
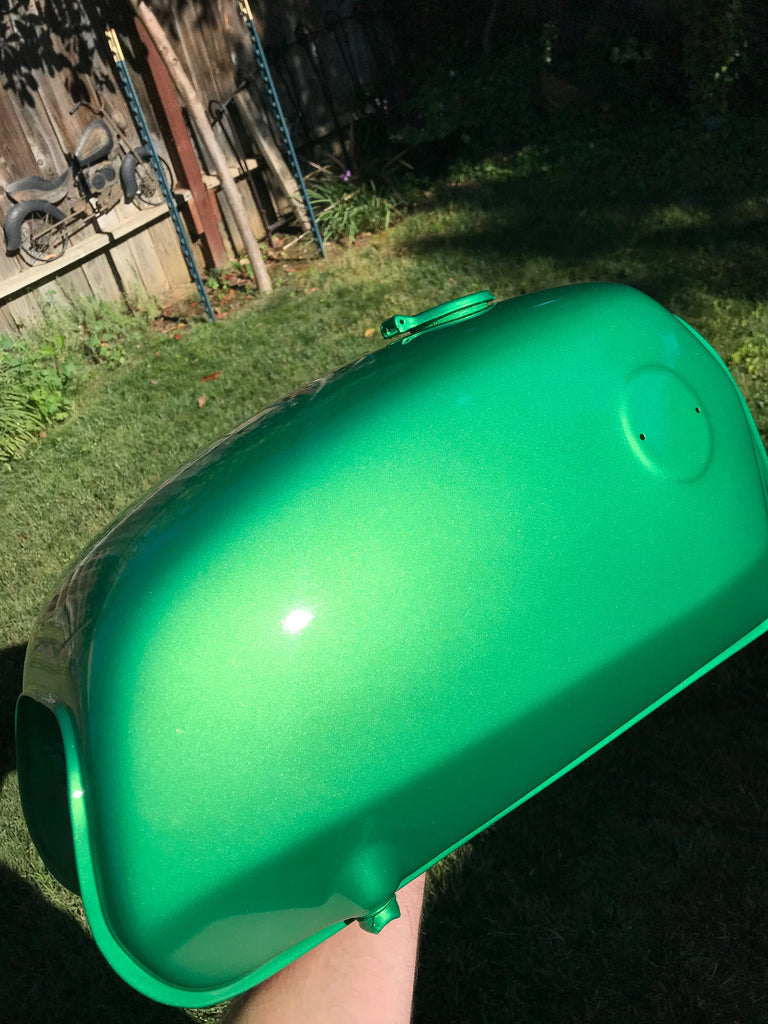
Here's what the color looks like in the sunlight.
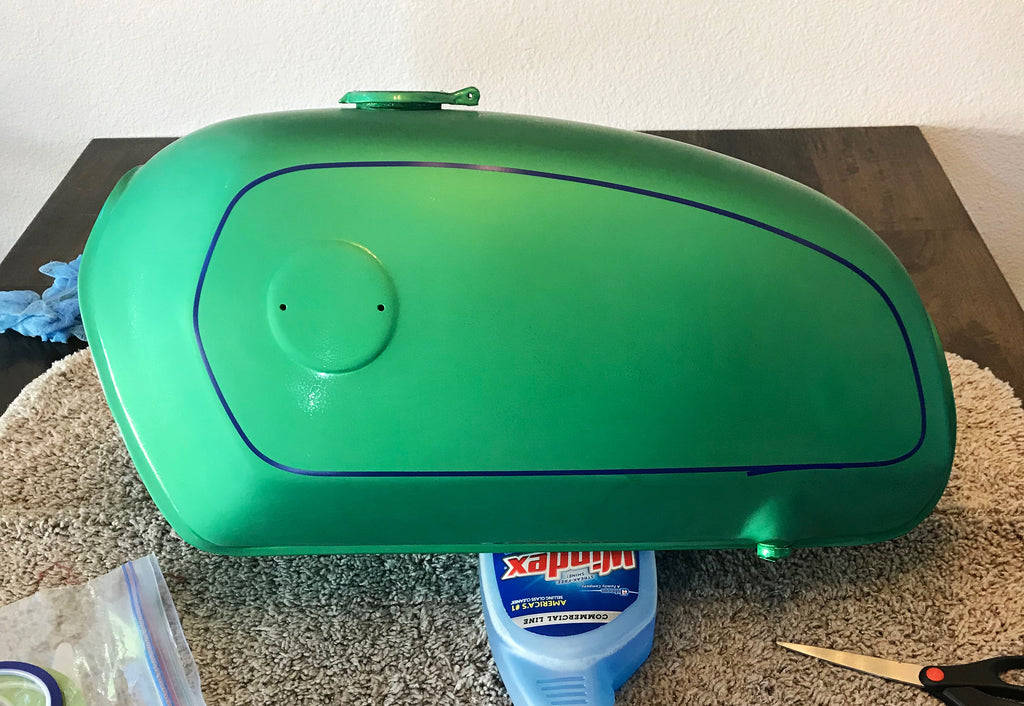
Here's a picture in the next stage - pin-striping. I sanded the tank down (by hand) using 800 grit paper and lots of water. As you can see I got most of the gloss off. Its okay if there is a little peeking though but you want to get most of it off. Doing so provides the mechanical adhesion component when you go to paint your pin-striping and second clear coat. If you paint clear on top of glossy (un-sanded) clear, it makes it very hard for proper adhesion to occur. I especially made sure to sand down the areas where the pin-striping was going to be. I use 3M pin-striping tape to create a stencil for the pin-striping paint. I know a lot of these bikes were stripped by hand but the truth is, if I attempted to do it, it'd look like a 1st grader's art project- 3rd grade at best. So, I use the tape. Turns out, i'm actually pretty good at running tape. I always do the outer most line first on both sides of the tank so I can match up both sides for consistency. One more thing- before I applied the tape, I cleaned the tank with windex and a rag and wiped it down with a tack cloth (removes dust)
So here is the stencil complete. I am ready for the pin striping paint!
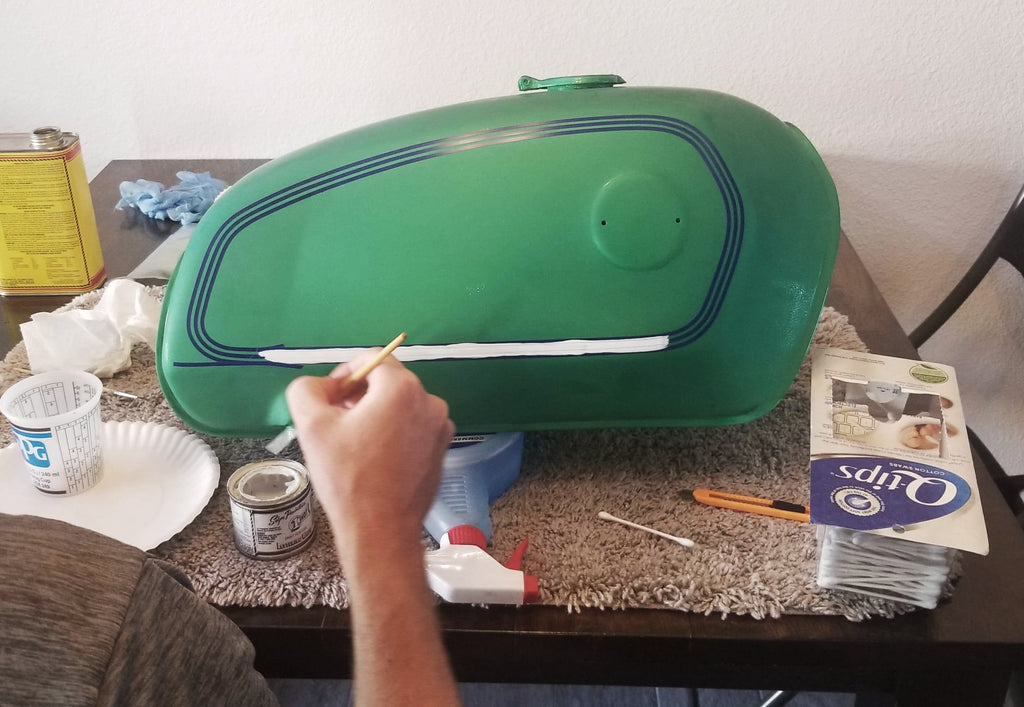
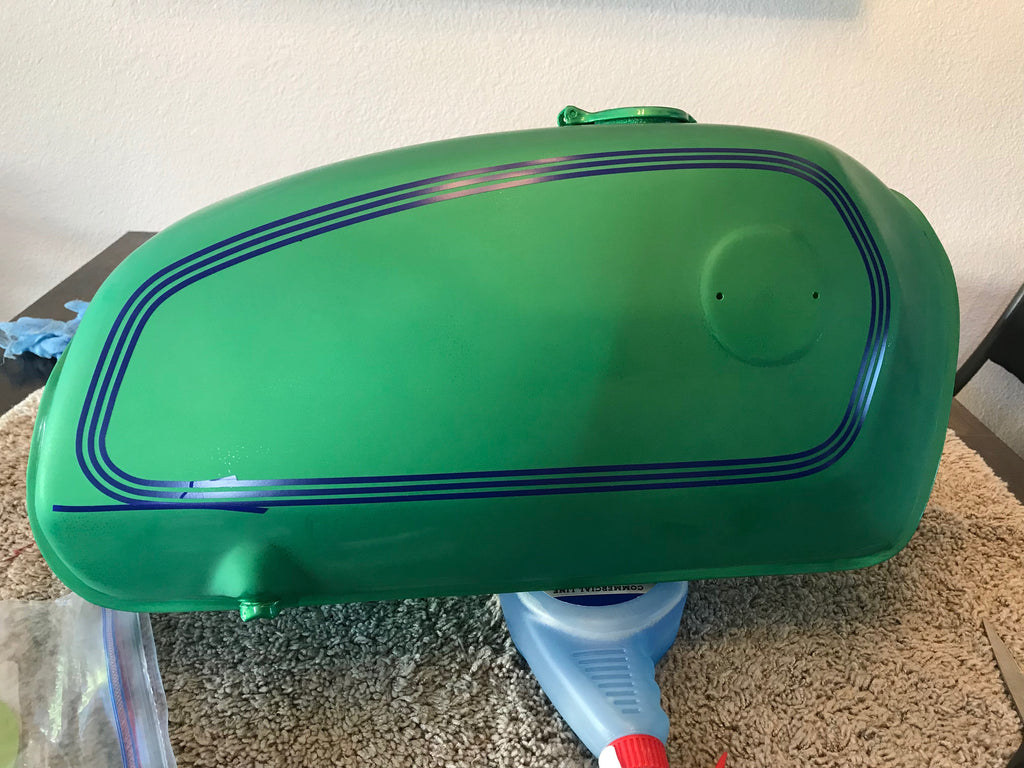
Here is an action shot of me painting in-between the lines. Or trying to. I use 1 shot pin striping paint. It's all the same but 1 shot is readily available. I use either lacquer thinner or 1 shot paint reducer. You need to work with it to get the right consistency to spread right and smooth.
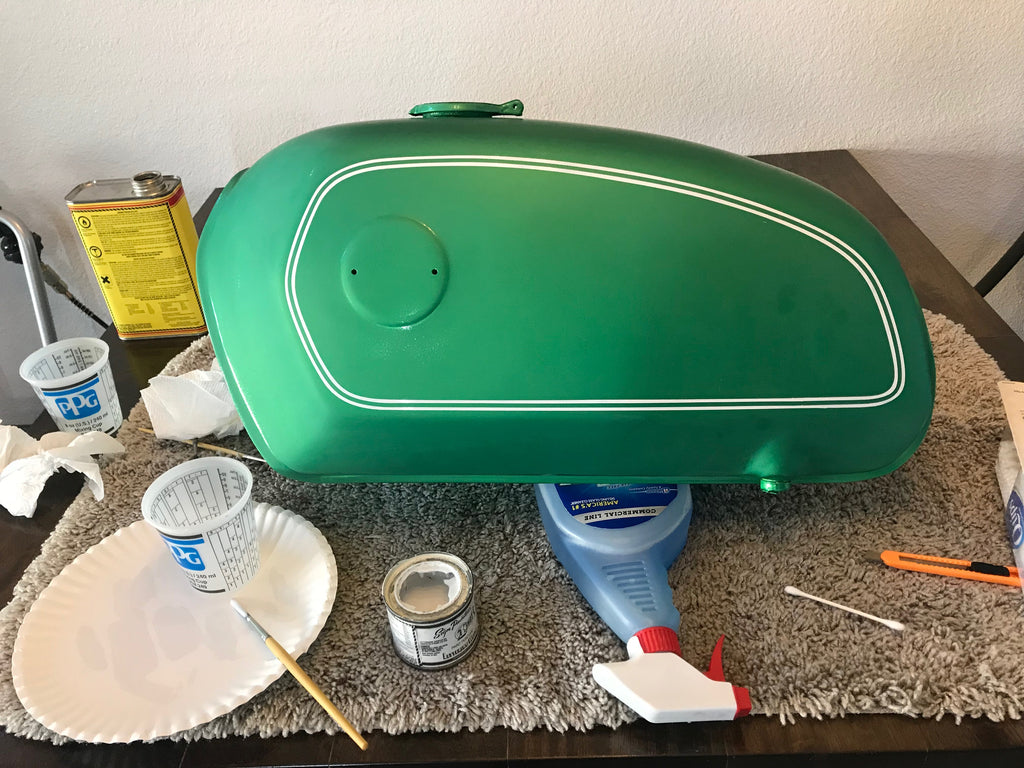
Here is the final product! Not too shabby. Ill lightly sand down areas on the tank where some white paint found its way to. Lacquer thinner works also when the paint is still wet. Ill let it sit for a day or two and then I will re-clear the pin striping to help bury it down so it won't be as noticeable under the final clear coat.
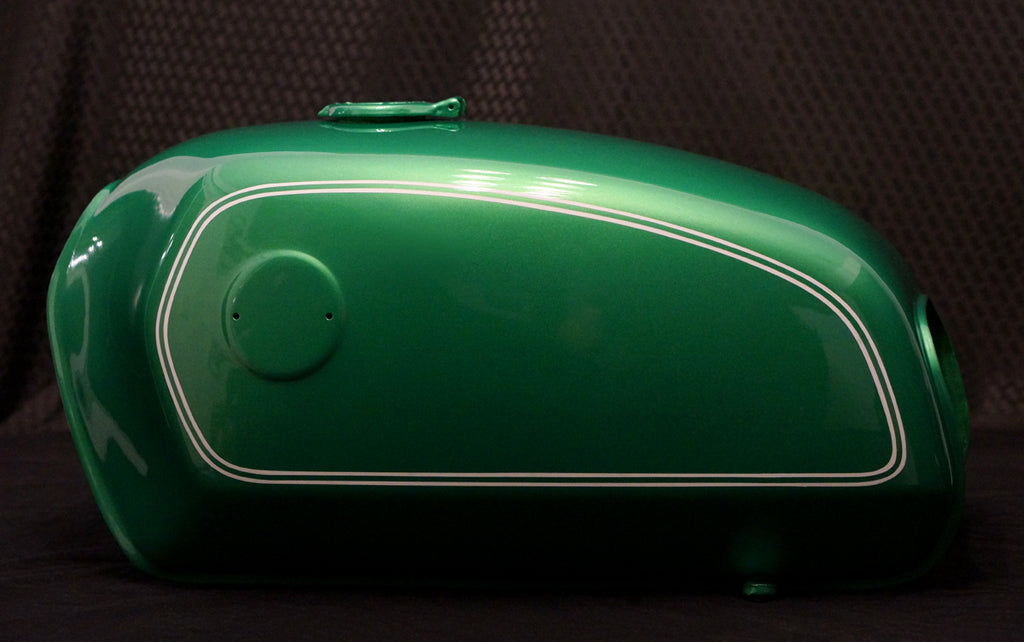
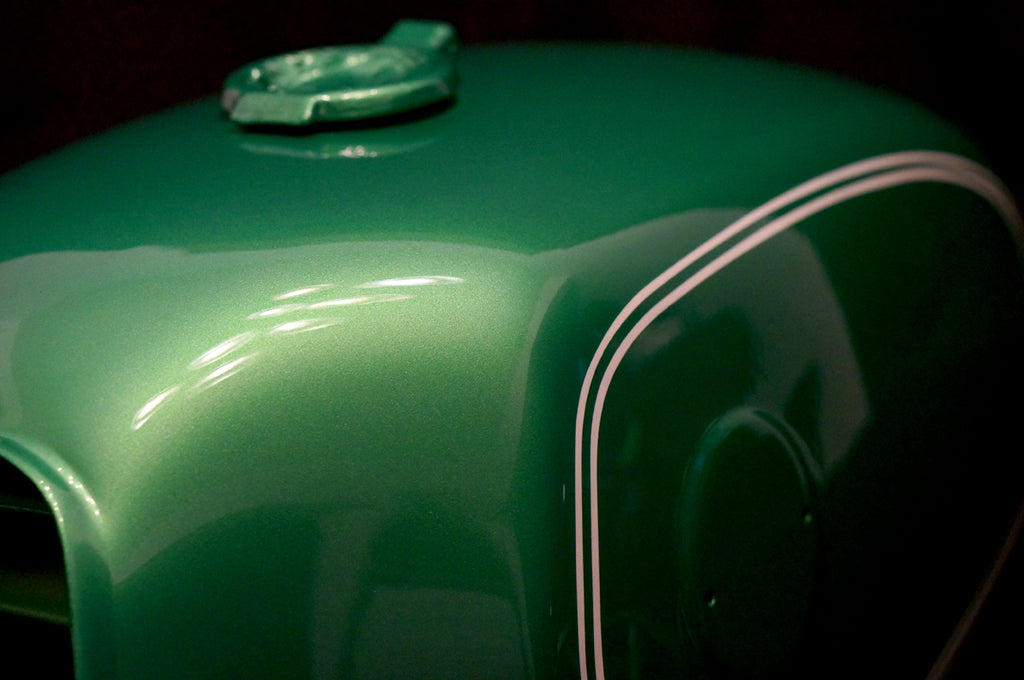
Here is the final product gentleman! A lot has happened since the last photo (pin stripping). After the pin striping paint dried (in this weather- summer) it dries and cures in about 24 hours. In the winter time, it could take up to 3 or 4 days without heat. You need to make sure its fully dry because when you apply a catalyzed urethane clear over the pin striping paint, and its not cured, the chemicals in the clear coat will eat through the paint causing it to crack and wrinkle. 2 coats of clear was added over the pin striping only. This is an inter-coat clear designed to just bury the pin striping a little so it doesn't protrude drastically out of the final finish. After the inter-coat clear has dried, I sanded the whole tank down with 800 grit paper. Then It was ready for the final clear coat (comprised of only 2 medium/thick coats). After the final clear coat was applied, I sanded down any dust bumps with 1500 sand paper. I then sanded the whole tank down with a special 3,000 grit pad. Then, I buffed and polished the tank to bring it back to its original shine minus any bumps and imperfections. The result- glass smooth original finish with a natural waviness in the clear.